💡 Follow this Guide in a Chrome Browser in a Desktop Computer
We have tried multiple browsers, phone and web, and the best option is Google Chrome for Web.
Otherwise, when you try to verify the meta business account below, it will say that the browser is not supported.
Requirements #
- A phone number that doesn’t have WhatsApp (for the whatsapp SMS Verification)
- Business Name, Address, Phone Number and Website.
- Business Type (Sole Proprietorship, LLC, Corp or Country equivalent).
- EIN/NIF (Optional)
- A privacy policy link on your website.
- An Accepted Document.
Verify your Meta Business Account
- If you haven’t created a business account, you can follow the steps here: Step 1: Create a Meta (Facebook) Business Account
- The Meta Business Account MUST be Verified, follow this link to initiate the process: https://business.facebook.com/latest/settings/security_center
Requirements for a business to be approved for WhatsApp
- Check all the details in: https://www.whatsapp.com/legal/business-solution-terms.
- Appoint a system administrator.
- Do not use data to:
- Track, build, or augment profiles on individual WhatsApp users.
- Share, transfer, sell, license, or distribute such data.
- Retarget on or off of WhatsApp and the Facebook Companies’ services, use piggybacking or redirects, or combine that data with any other third-party sources of data.
- Reporting: If Meta requests it, you will agree to provide Meta reports related to your usage of the WhatsApp Business Solution, no later than 30 days of the request.
Setup a Payment Method
A Payment Method needs to be on file, you can set it up here: https://business.facebook.com/billing_hub/accounts/details/.
Step 1: Create a Meta (Facebook) Business Account #
Create an Account
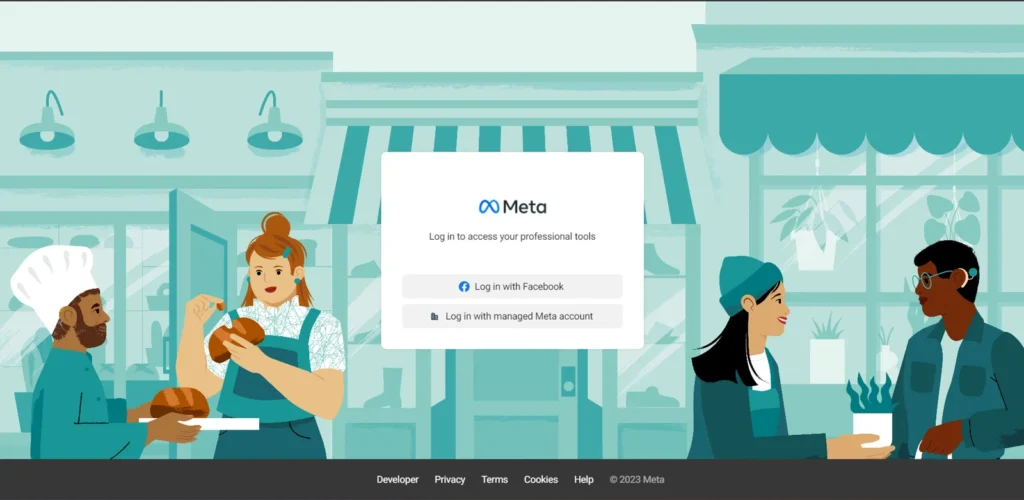
To create a Meta (Facebook) Business Account go to https://business.facebook.com.
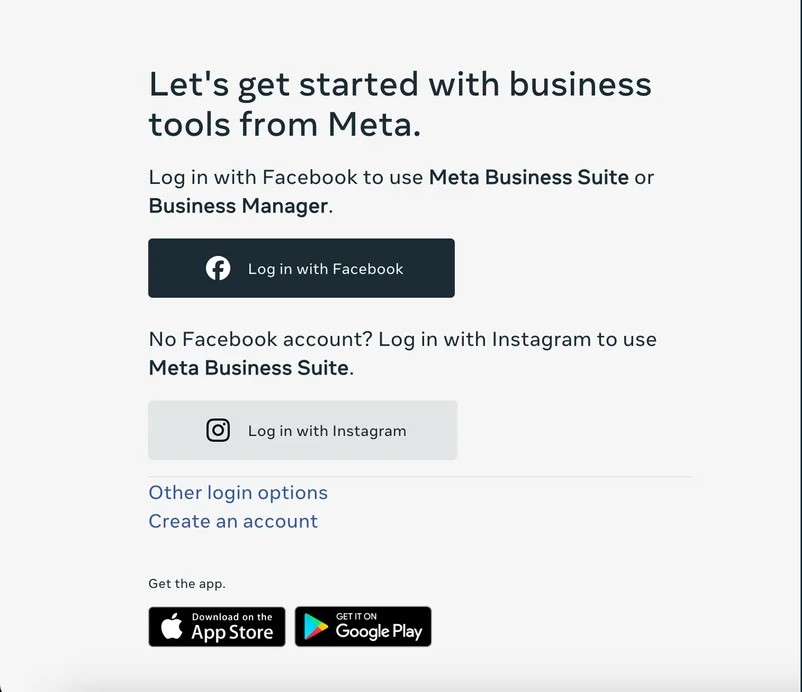
- Click on “Create an account” if you do not have an account in Meta to create one. Otherwise log in with your Facebook account to access the Business Manager.
- Once you have logged in with Facebook or created a Meta Facebook account. You will see the following view.
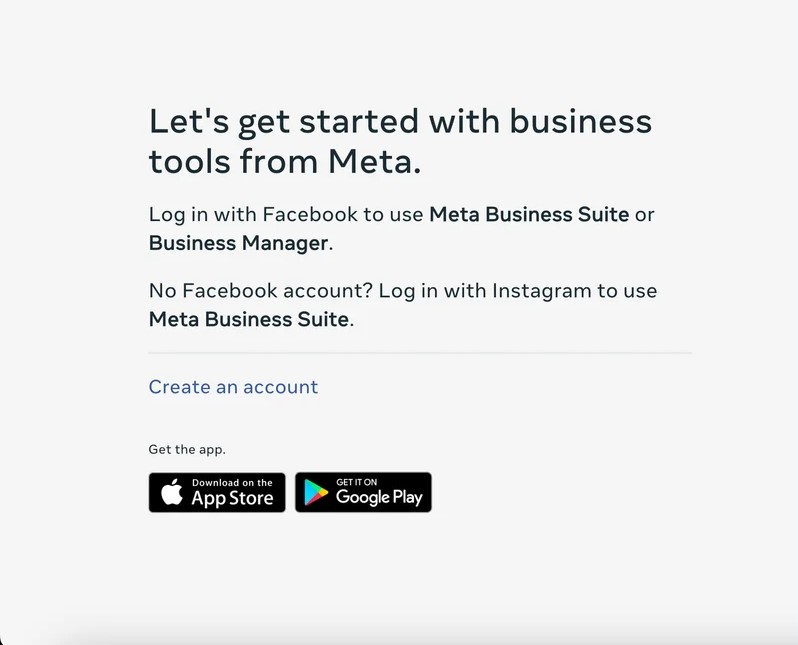
- Click “Create an account”
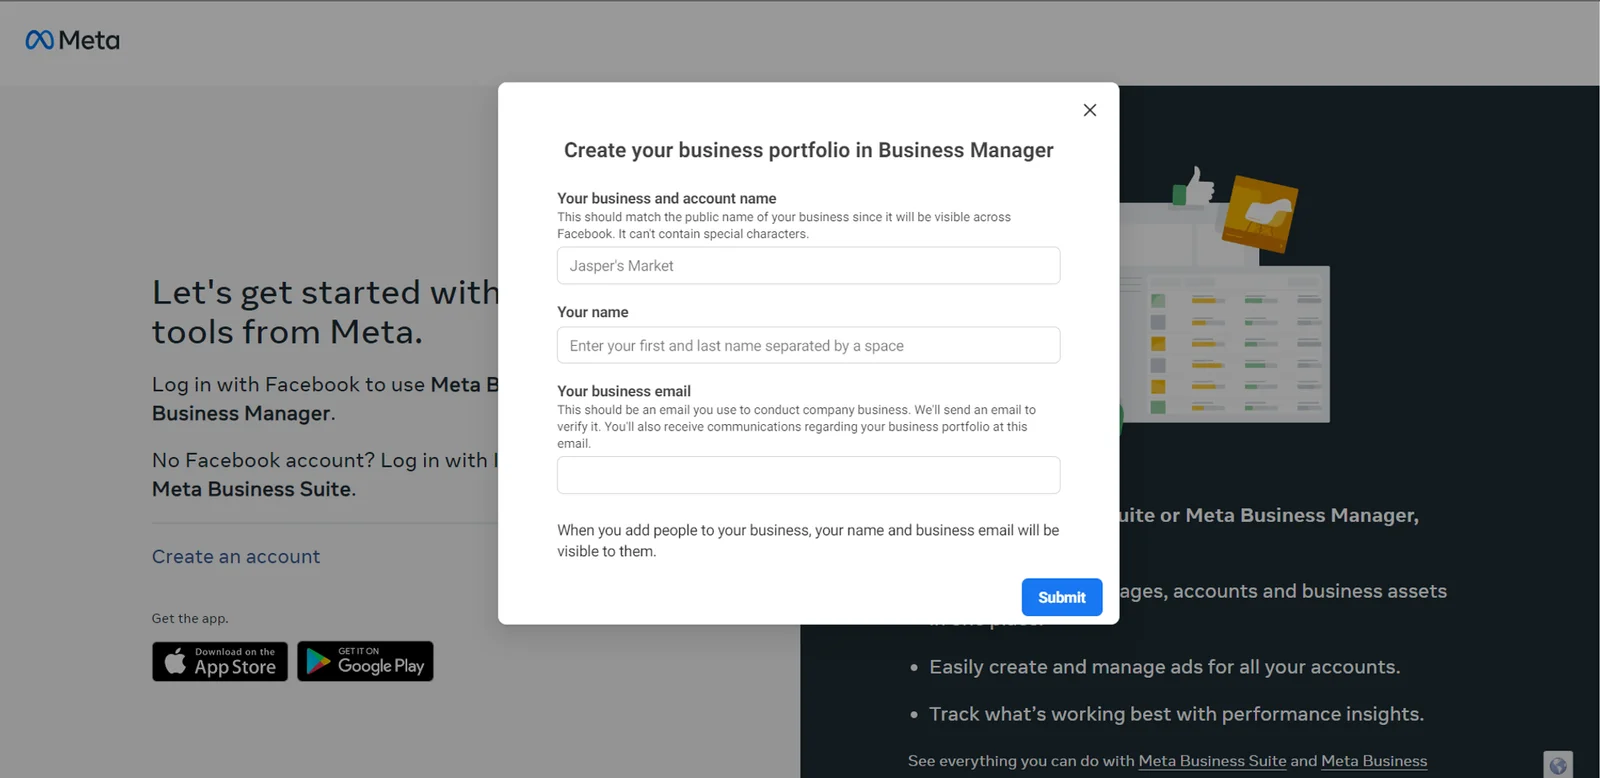
- Enter your business name, your name, and work email address.
- Provide your business details and click “Submit”.
Optional: Add more 2fa (2-factor Authentication) methods to your Meta Business Account.
Meta often requires 2FA security to access some settings like the Security Center on your account. Many times it has been proven that the code does not arrive, sometimes taking hours, and sometimes it doesn’t even happen. For this reason, we should add other methods of 2fa, otherwise, the processes that we need to execute will be stalled.
Recommended Authentication Methods.
- Use Authy as an authenticator app: the reason this is the best app, it’s that you can password-protect all the other codes that you add in the app. So it only 1 password, you can recover all these authentication codes, even if you change or lose your phone.
- Recovery codes: create recovery codes and write them down in a safe place. Usually this is used as a backup method.
Process
- Login to facebook.com with the account that manages the Meta Business Suite.
- Go to Account Center password and security: https://accountscenter.facebook.com/password_and_security
- Select Two-Factor Authentication > Facebook or Instagram
Step 2: Create a new Facebook Developers Application #
Create a new Meta (Facebook) App at https://developers.facebook.com/.
- Log in” to your Meta (Facebook) Developer Account.
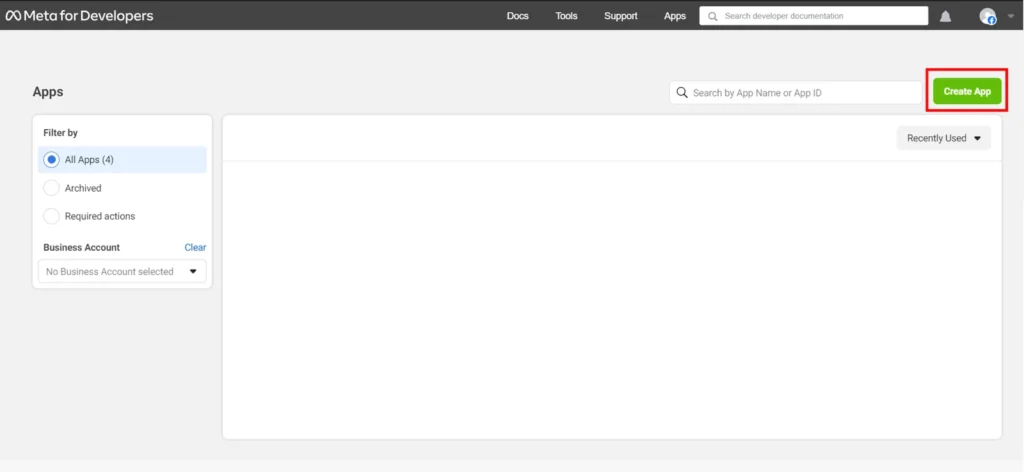
- Select “My Apps”.

- If you don’t have any previous app, create one by clicking Get Started.
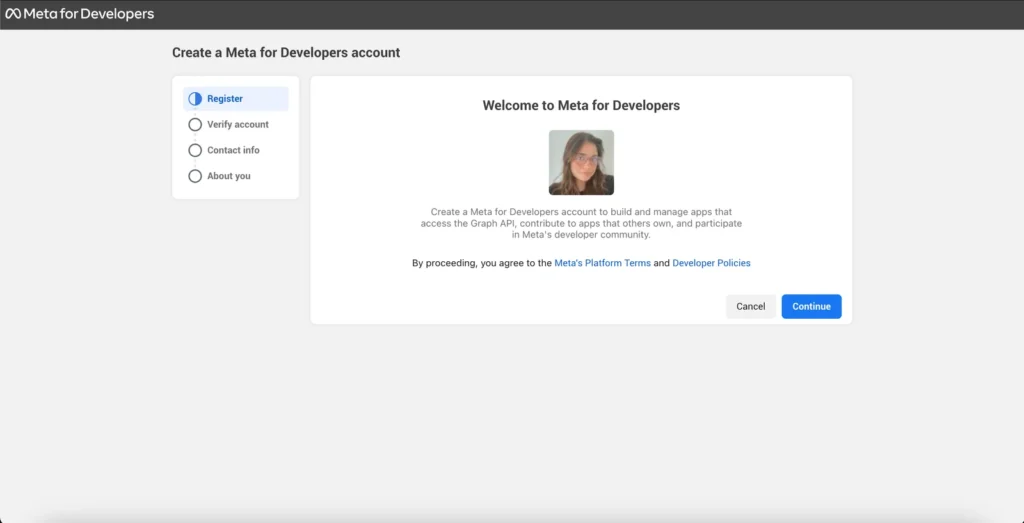
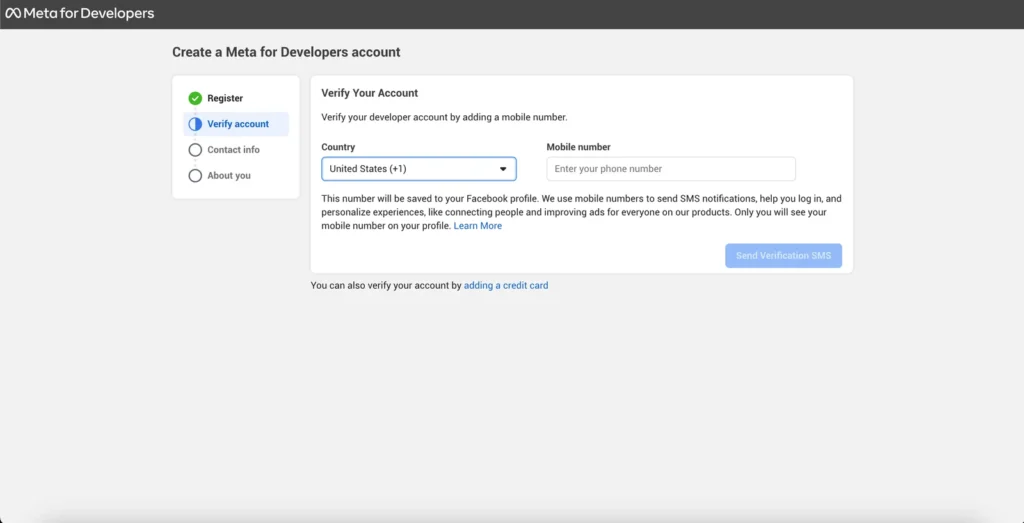
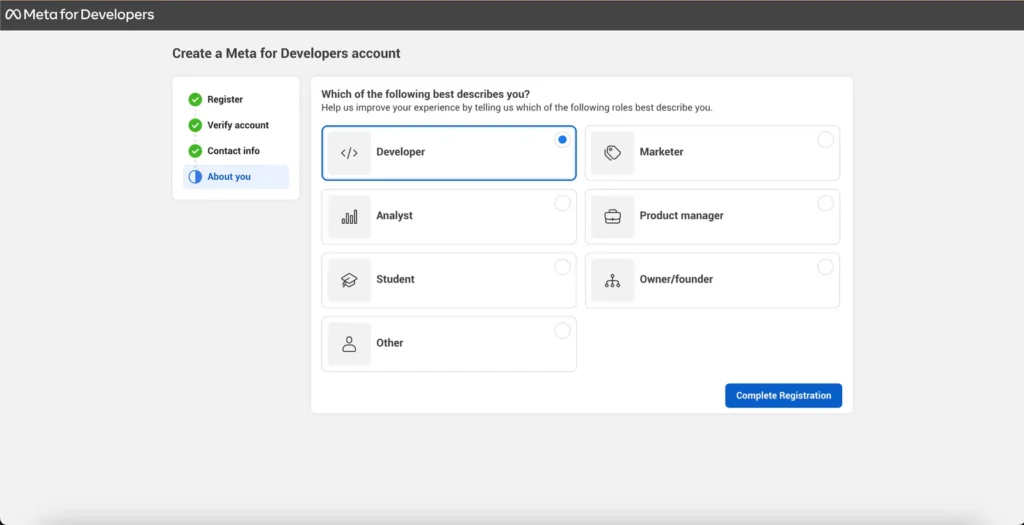
- Complete the remaining steps to create your Developer Account.
- Choose User Case Other and click Next.
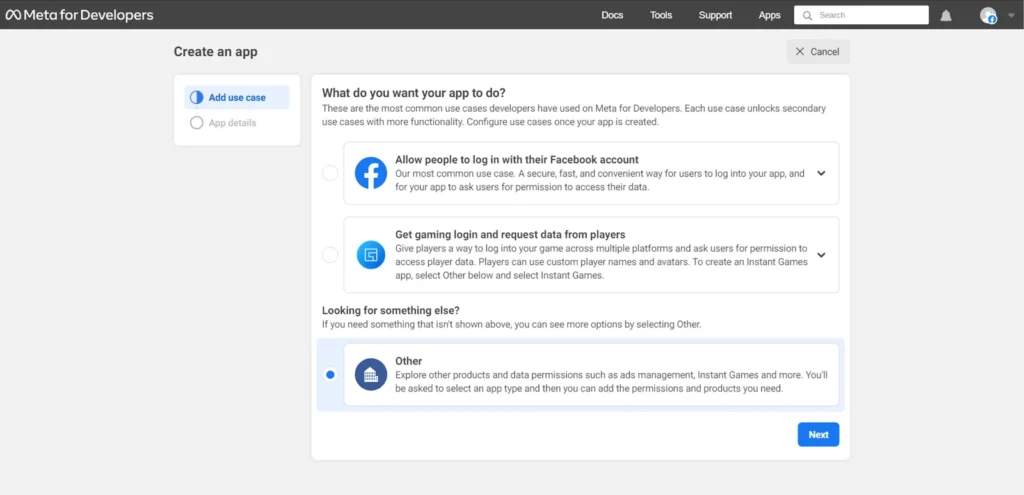
- Choose app type Bussiness and click Next.

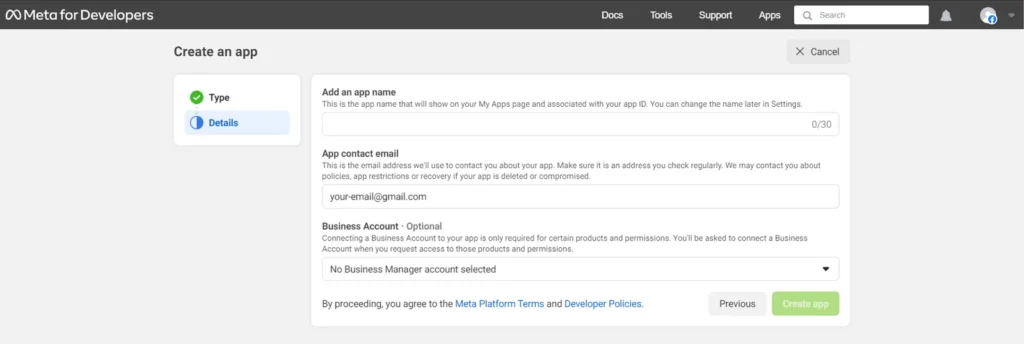
- Provide the necessary app details: Name, Contact Email, and Business Account (Optional), and click Create app.
Step 3: Link your Application with your WhatsApp Account #
Integrate WhatsApp with your Meta App.
- In the “Developers Dashboard”, choose your app.
- Locate “Add products to your app” in your app’s dashboard tab.
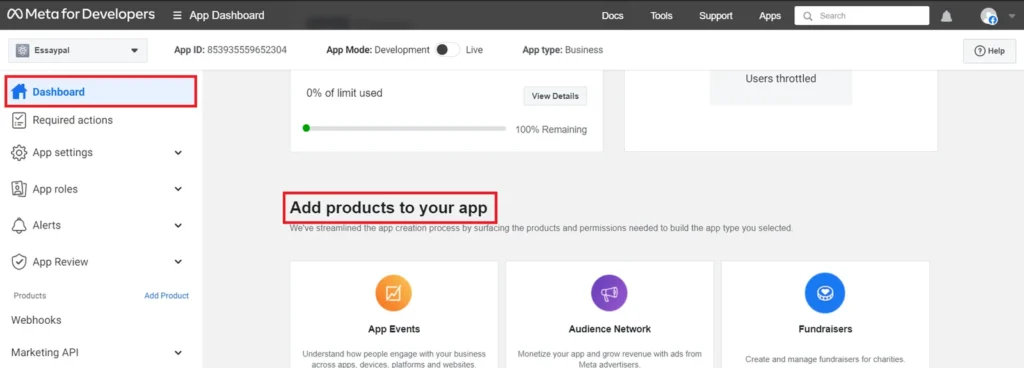
Choose WhatsApp for setup.
💡In case WhatsApp does not show up as an option:
- Make sure you have a Verified Meta Business Account.
- Delete the app and try making an application from Meta Business Manager Settings > Apps. It links the account better to the app.
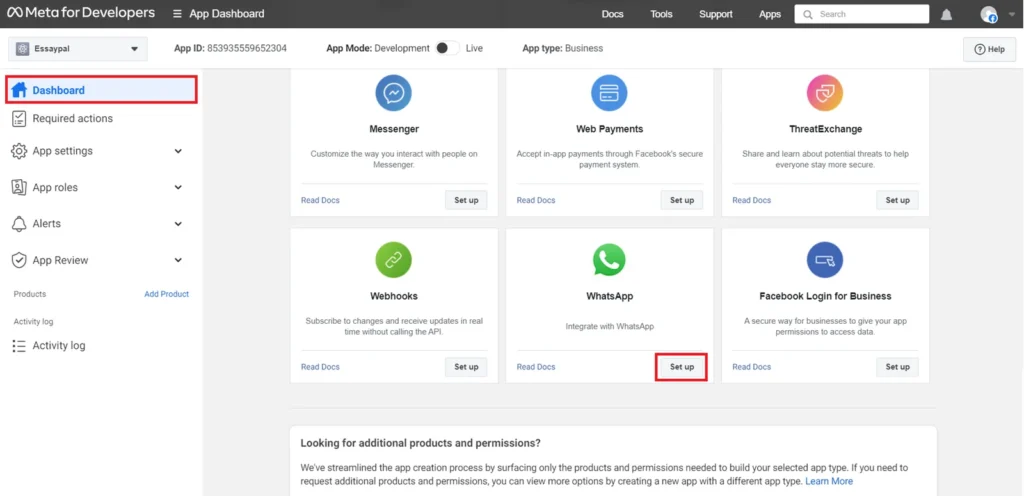
- Select your Meta (Facebook) Business Account (if not selected in step 2).
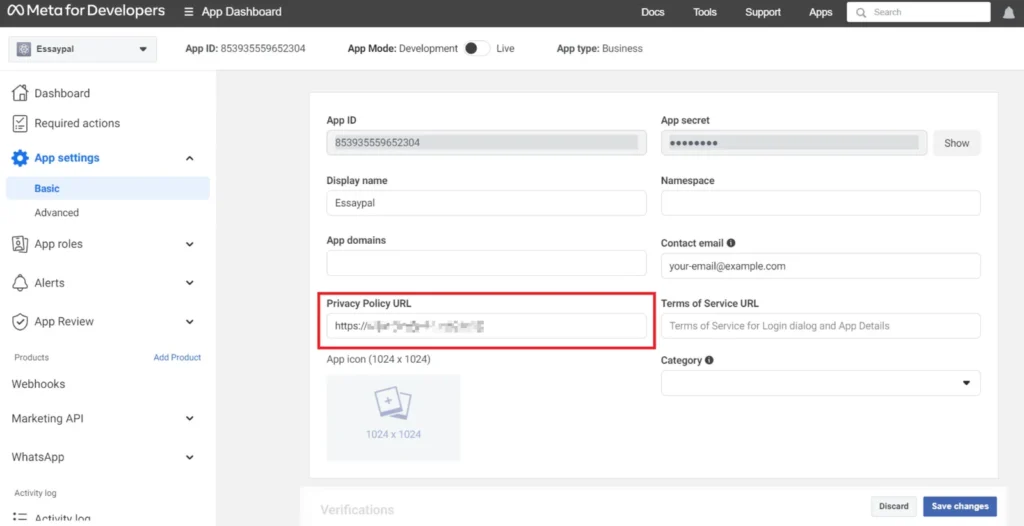
- Navigate to App settings > Basic from the sidebar
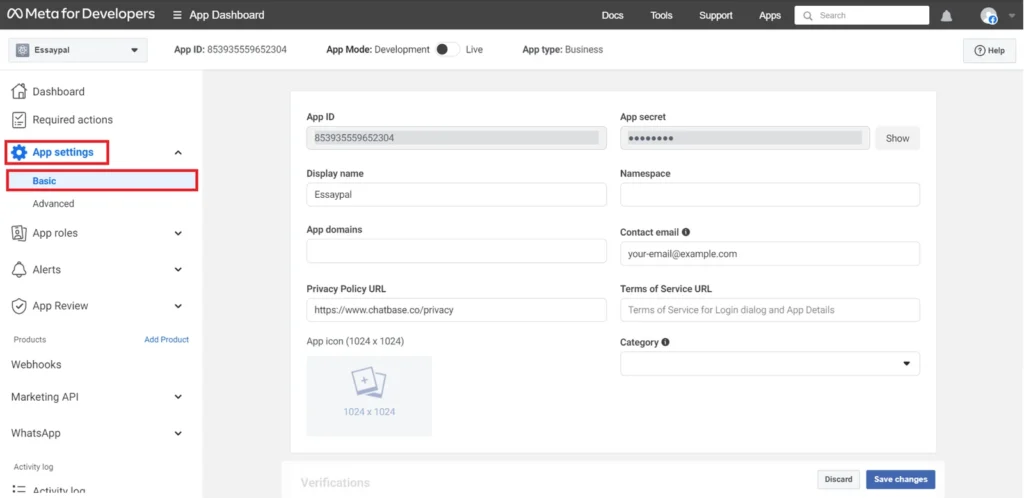
- Set the Privacy Policy URL to https://iamgloria.com/en/privacy-policy/
- Save changes and set App Mode to Live.

Step 4: Generate WhatsApp Token #
To obtain a permanent WhatsApp Access Token, follow steps 1 to 3 :
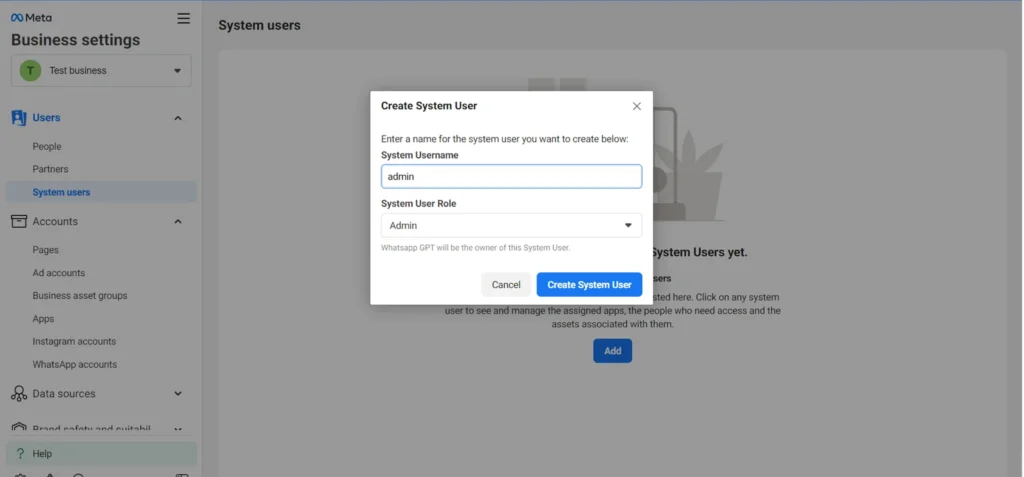
- Create a “System User”:
- Click Business Settings.
- Visit the Meta Business Suite.
- Find your business account in the top-left dropdown menu and click its Settings (gear) icon.
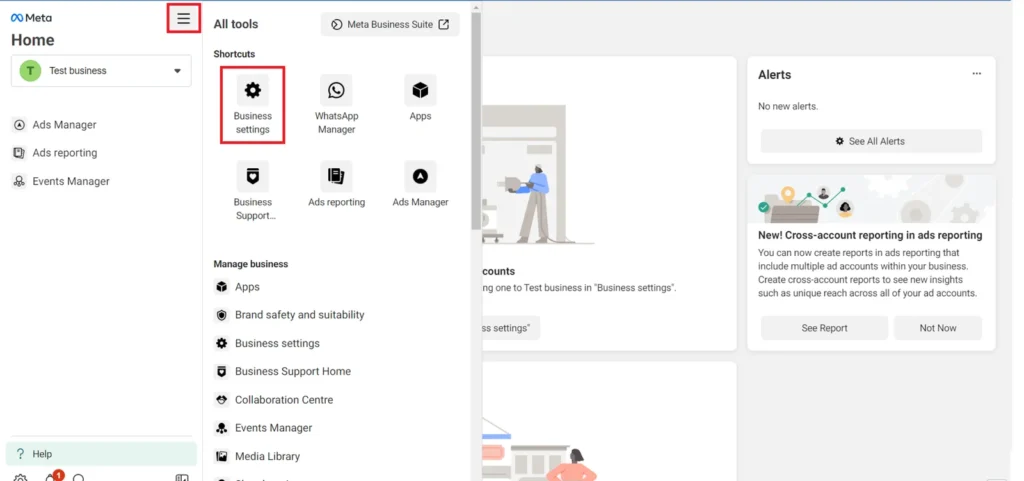
- Go to Users > System users.
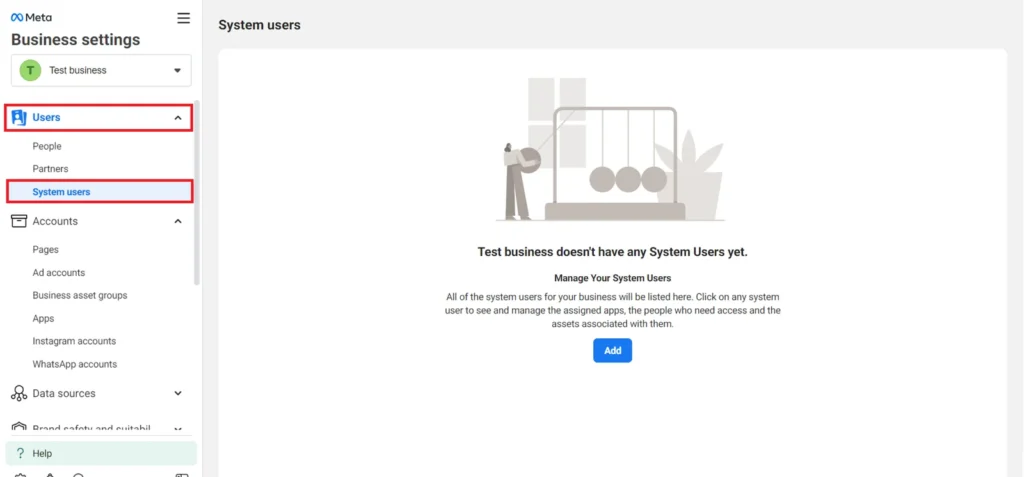
- Create an Admin System User.
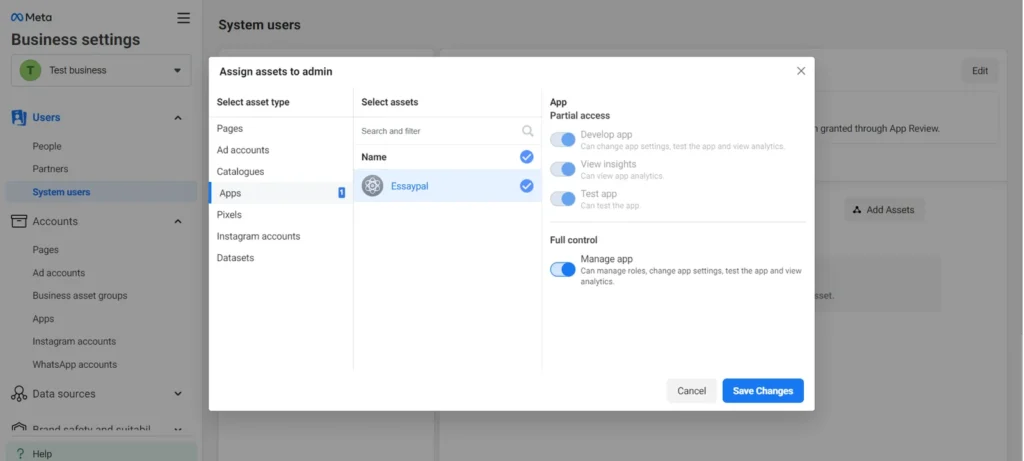
- Add Assets.
- After creating the system user, click on Add Assets.
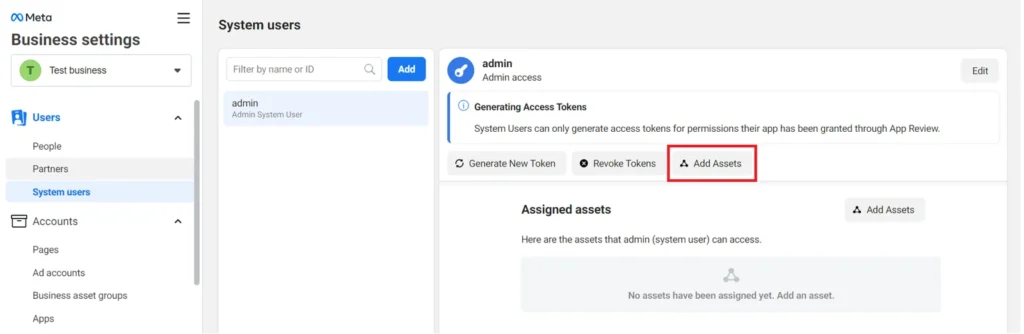
- Navigate to Apps > “Your app name“.
- Select your app and grant full control to manage the app.
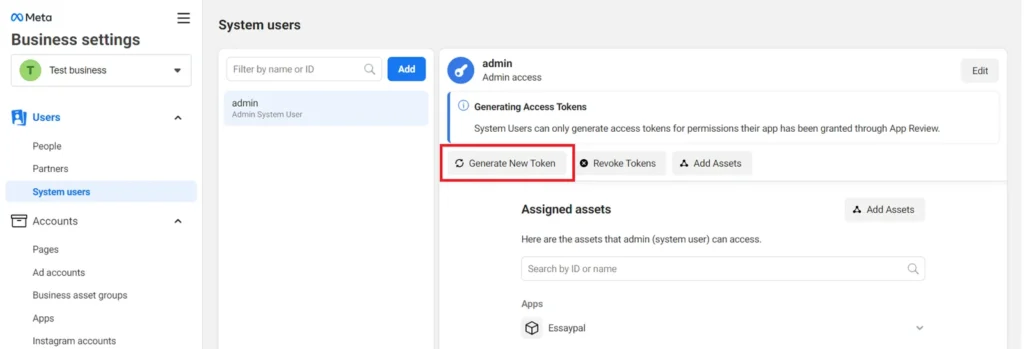
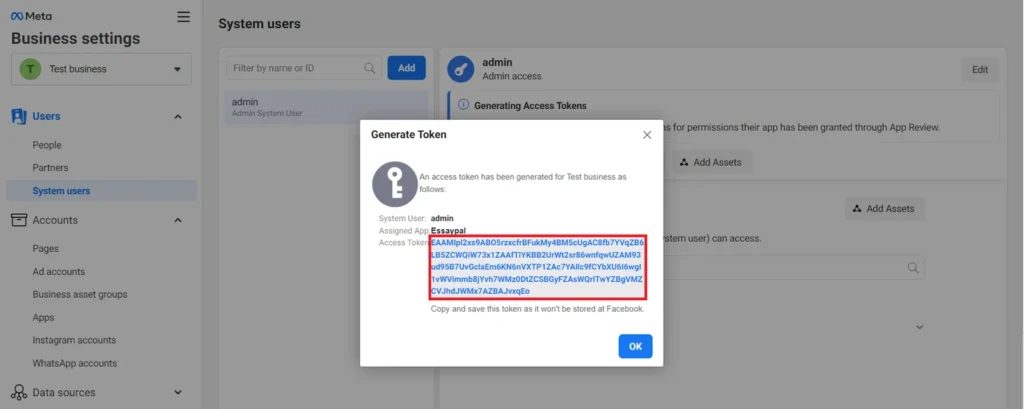
- Generate System User Access Tokens.
- Click the Generate New Token button on the system user.
- Choose the app that will use the token and set the token expiration to never.
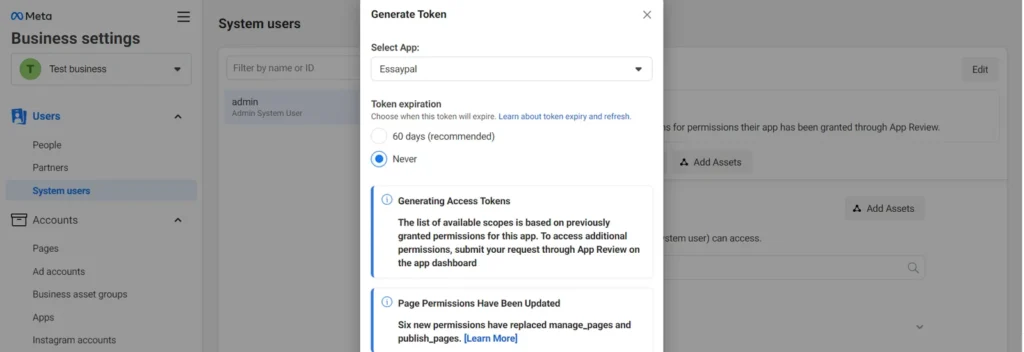
- Select whatsapp_business_messaging and whatsapp_business_management permissions.

- Generate the token.
- Copy the access token and store it securely.
💡You will need to share this token with the Gloria AI Team in the last step of this guide
- You can use your business number or the provided test number for your WhatsApp chatbot.
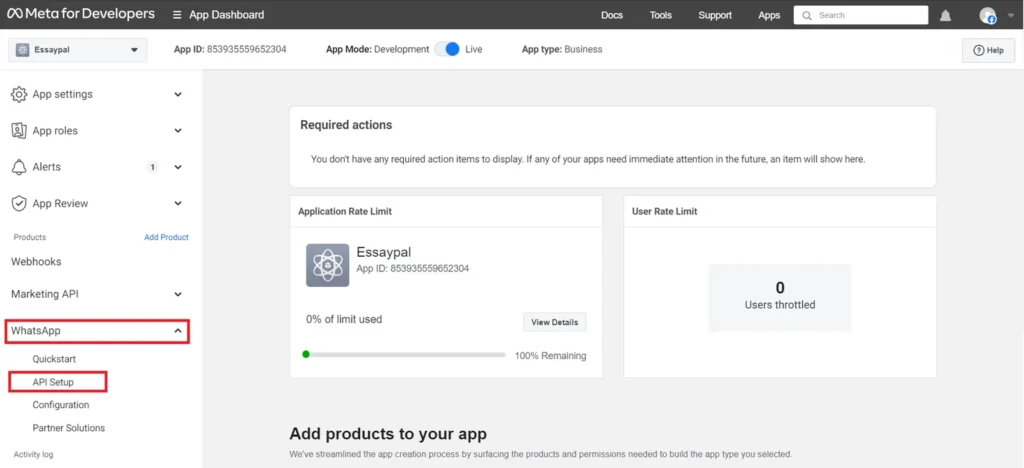
- In the WhatsApp Developer Dashboard, navigate to WhatsApp > API Setup from the sidebar.
- Proceed to Step 5: Add a Phone Number click Add phone number.
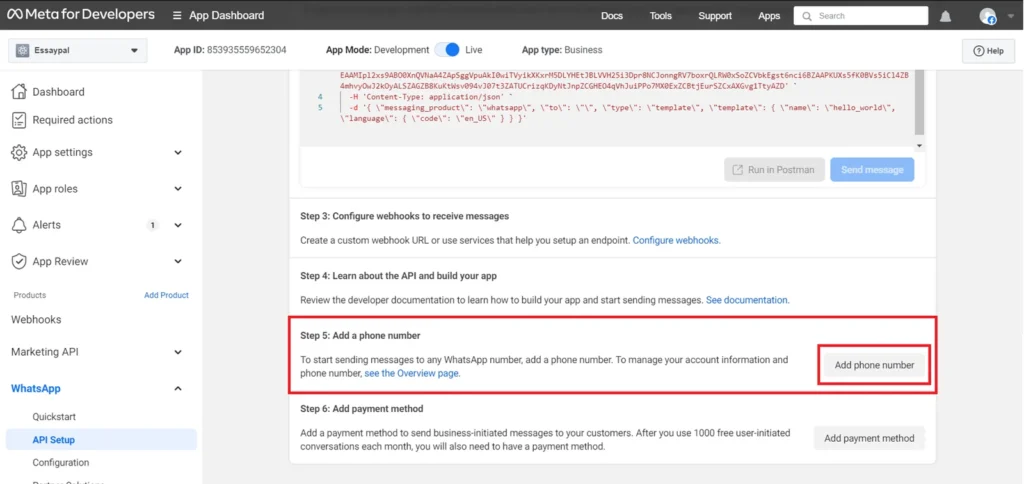
- Provide the details required in the following form.
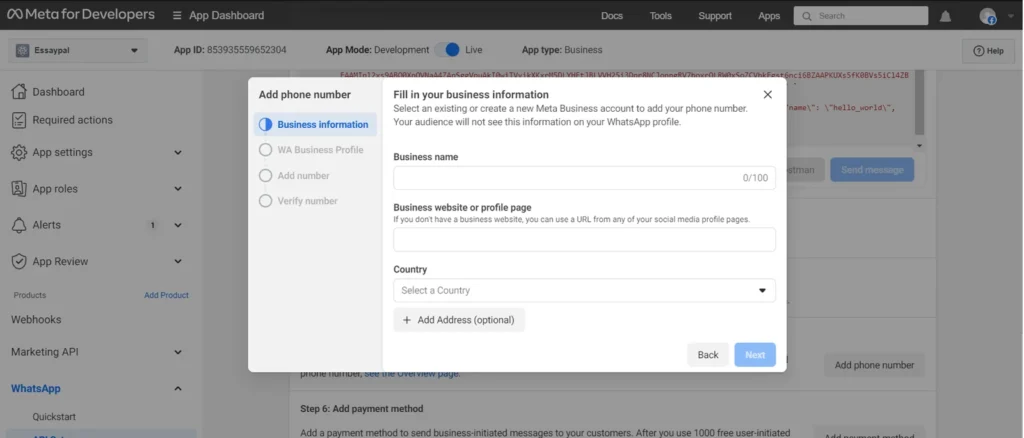
- Verify your number using the received code.
- Once successfully added, select your phone number in Step 1 of API Setup.

- Add a Payment Method
- To send messages via WhatsApp, you need a valid payment method. Visit here for details.
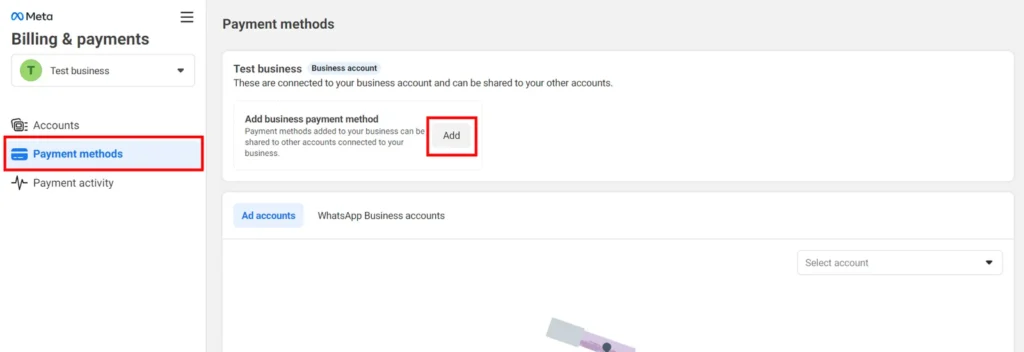
- After adding your business phone number, click “Add payment method” to address the “Missing valid payment method” alert.

- You’ll be directed to your WhatsApp account settings. Click Payment Methods > Add business payment method and follow the prompts to add your card info.
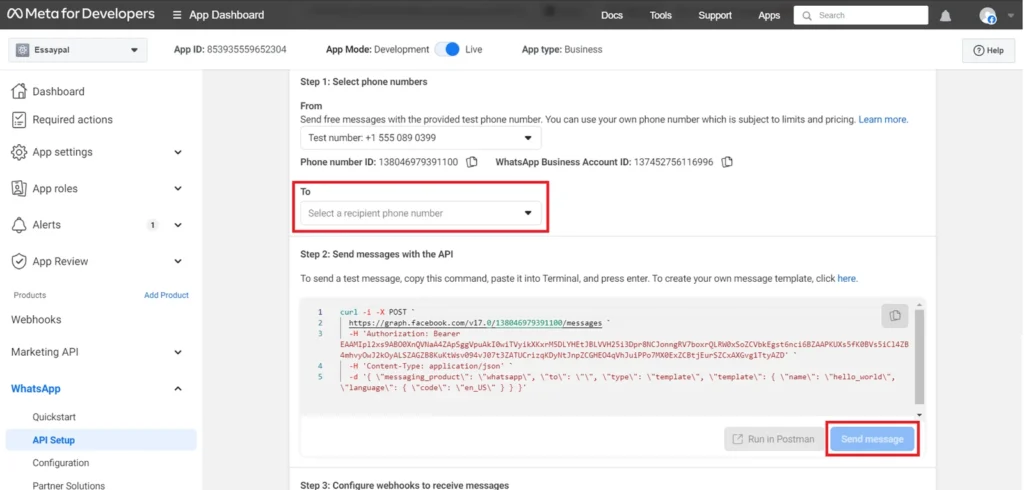
- Test your new Business Number for WhatsApp
- Return to WhatsApp Developer Dashboard, navigate to API Setup > Step 1.
- Enter a testing “To” number.
- Click “Send message” to verify successful message delivery.
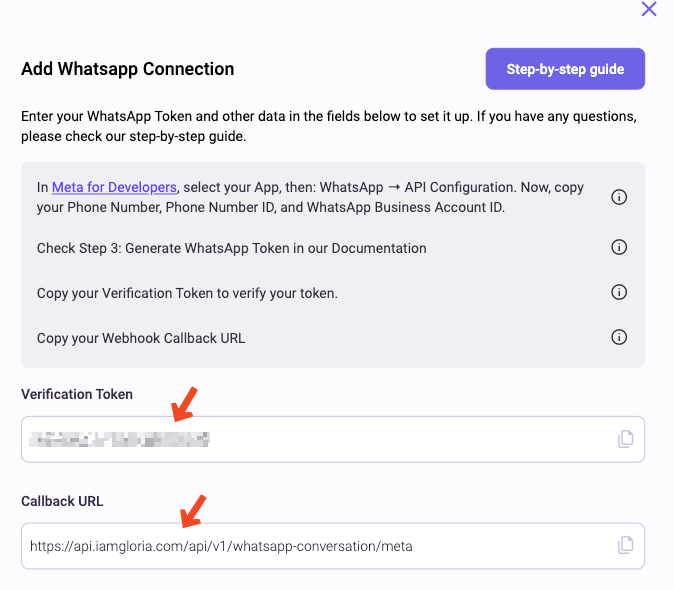
Step 5: Configure WhatsApp API Webhook settings #
- Verify WhatsApp Webhook Callback.
- In the WhatsApp Developer Dashboard, navigate to Configuration.
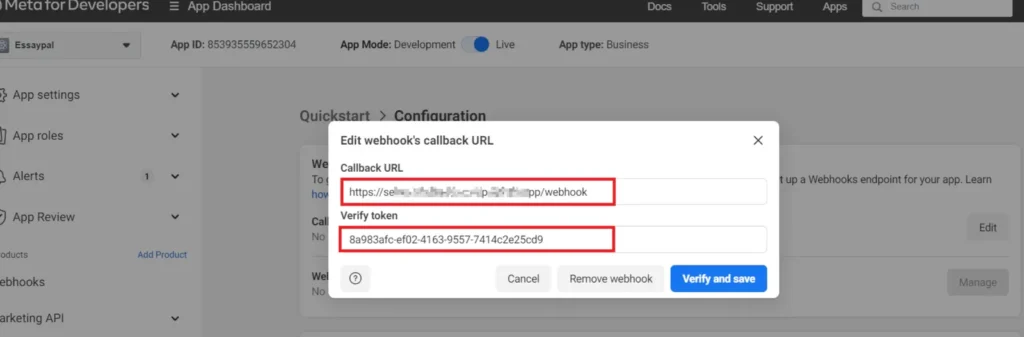
- Under Webhook, click edit.
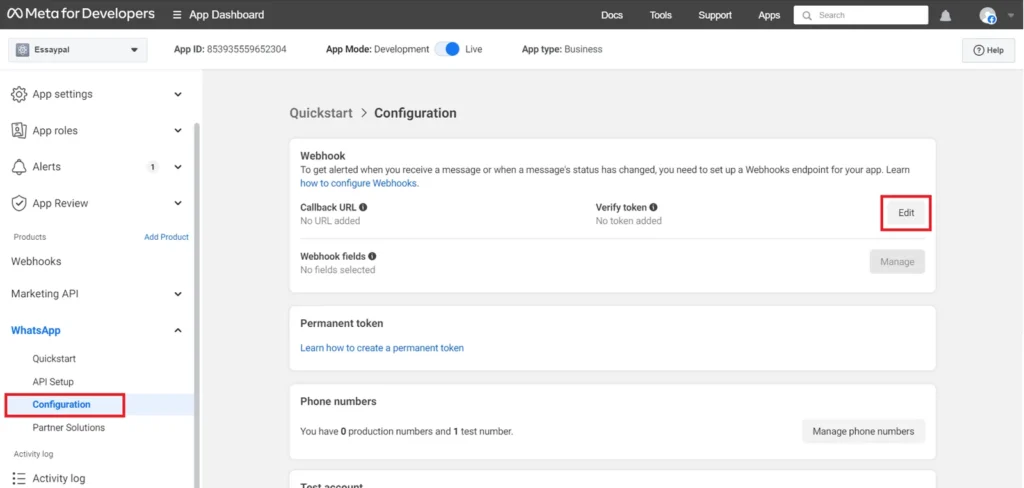
- Copy the Callback URL (https://api.iamgloria.com/api/v1/whatsapp-conversation/meta) and the Verification Token proportionated by the Gloria AI team to your WhatsApp Developer Dashboard.
- Click Verify and save.
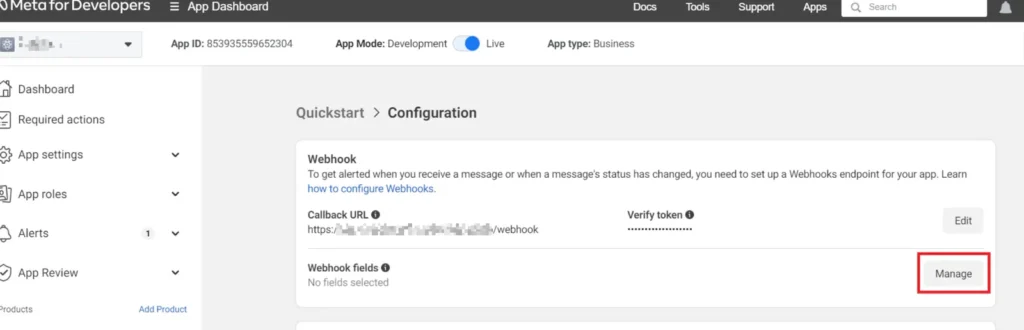
- Configure Webhook Subscription Field
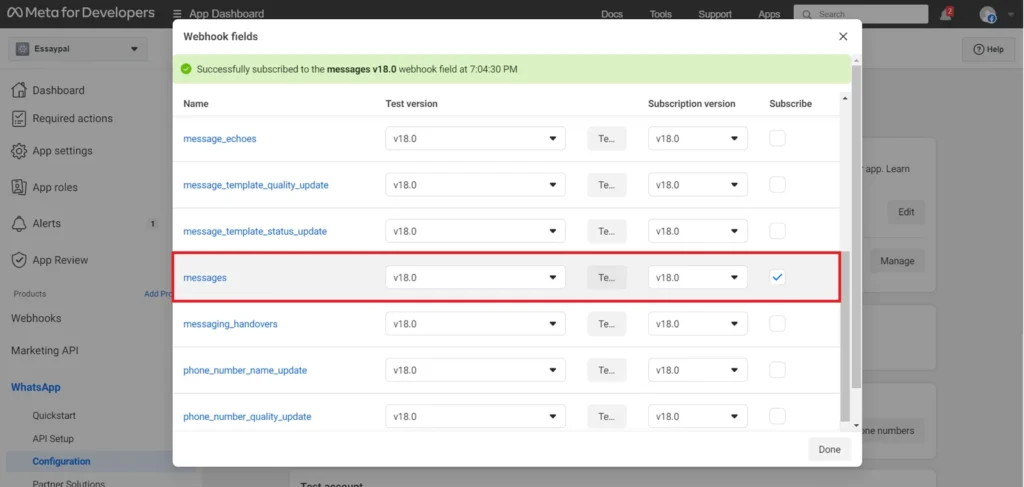
- Under Webhook Fields, click Manage.
- Find the messages field and subscribe to it by checking the box.
- Return to Gloria and click Verify.
Step 6: Gloria AI Dashboard – Information to collect #
- Copy and prepare the following Data for the meta configuration:
- The Verification Token.
- The Callback URL.
- Copy the verification token and Callback URL because the Meta Setup with ask for it.
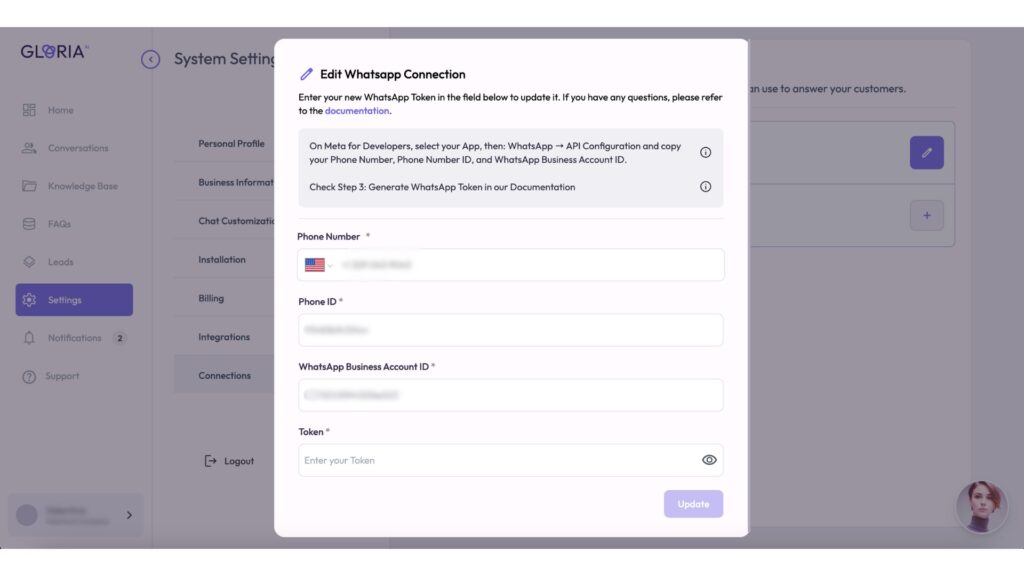
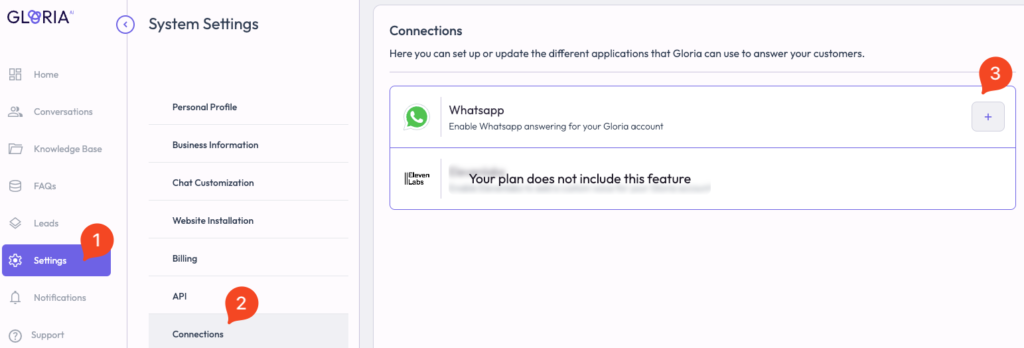
Step 7: Send your WhatsApp account information to the Gloria AI team or complete the form in the Gloria Back office under Settings/Connections. #
- Retrieve WhatsApp Account Information
💡You need to send the following information to [email protected].
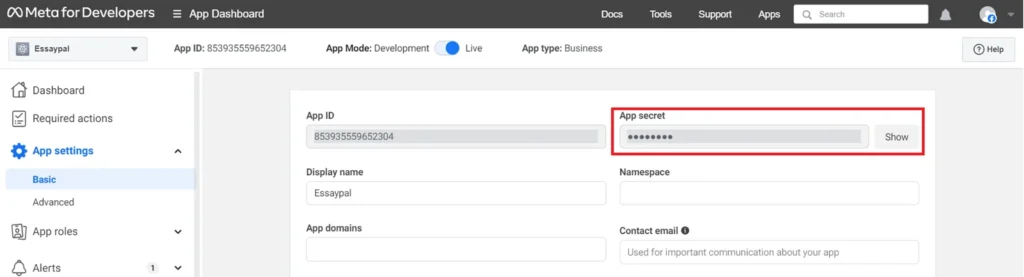
- In the WhatsApp Developer Dashboard, navigate to App Settings > Basic.
- Copy the App secret and paste it into the email.
- Copy the permanent access token generated from Step 3.3 in an email.
- Also copy your Phone Number, Phone Number ID, and WhatsApp Business Account ID.

- Complete the form in the Gloria Back office. Navigate to Settings > Connections.